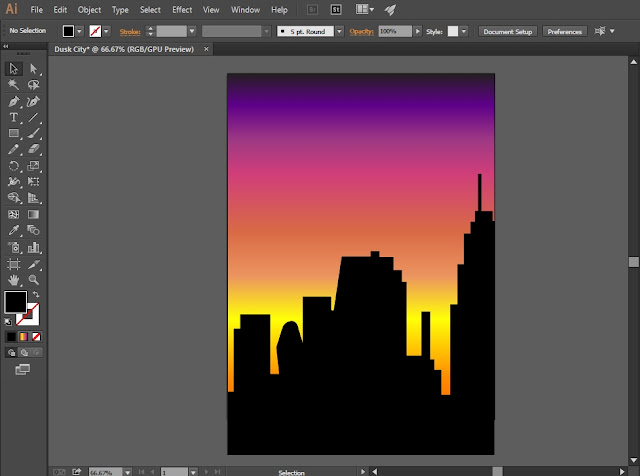
How to Make "Dusk City" in Adobe illustrator


http://illustutor.blogspot.co.id/2018/01/how-to-make-dusk-city-in-adobe.html
copy and open the link above for a better view!

Hello There, Visitor!
In this post, I will teach you how to make an art just like the picture above
Using Adobe Illustrator CC 2015...

Okay then, Andiamo~

First thing first! Open your new document
Making a new document by going to File > New or simply by pressing Ctrl + N
In this tutorial, I will use 'Portrait' Orientation
for the Color Mode, you can use between CMYK or RGB
and.. click 'OK'
Now, let's begin the tutorial!

1. Gradient (Dusk) Background
    Add a rectangle (press 'M') and cover the white layer. To make the gradient, go to 'Gradient' (by pressing Ctrl + F9). And change the Type to 'Linear', and set the 'Angle' to 90°, Now it will probably get to this

2. Color of Dusk
    Have you ever see a dusk before? if you have.. you must already know the colors. Alright, now to make the 'Gradient of Dusk', double click at the 'Gradient Slider'

 and set the color to orange

To add another 'Gradient Silder'. Press anywhere between the gradient slider's space, and make it more like this (it looks like a social app :v)

List of colors that I use (from the bottom to the top):
  1. #FF6300
  2. #FF8D00
  3. #FFFF07
  4. #EC9460
  5. #D86A45
  6. #D03E79
  7. #9F3984
  8. #5E0089
  9. #231F20
3. Silhouette City
    Using pen tool (press 'P') make the city landscape (you can make it more simple if you don't like this)
Now, let's save your project as a picture format (PNG, JPG, etc.)

How to Save your project as a Picture Format (PNG, JPG, etc.)
1. Go to File > Export
2. Change "Save as type" to 'JPG' or 'PNG' (or maybe other formats)
3. Click "Export"
4. Change the Settings according to your work
5. And now, your Art Work is done~

That's all for the post today!
if you still confuse how to make it, ask me in the comment below
~Have a great day~
( ͡^ ͜ʖ ͡^)

How to Make Flat Icon and Long shadow in Adobe illustrator


Hello There, Visitor!
In this post, I will teach you how to make an easy Flat Icon and Long Shadow
But, not like the picture above :3 I will make it more simple
(owh... and I'm using Adobe Illustrator CC 2015 version)

Okay then, vamonos~

First thing first! Open your new document
Making a new document by going to File > New or simply by pressing Ctrl + N
I recommend to work on square sheet like 800px x 800px (but, it's up to you)
for the Color Mode you can use between CMYK or RGB
and.. click 'OK'
The thing that I will make is a "illustutor" text with a long shadow, more like this


Now, let's begin the tutorial!

1. Add background
    The background is a must to make 'long shadow' visible. Add a rectangle to cover the white layer, and don't forget to color it (bright color are recommended)

2. Type the text
    Click the 'Type tool' or simply by pressing 'T' button on your keyboard. Click anywhere on your canvas, and type 'illustutor' (or maybe something else) and color the text white

3. Select the text, and open 'Transform' (Effect > Distort & Transform > Transform)

it will open the 'Transform Effect', change the 'Move' horizontal and vertical to '0.5 px', and set the copies to '880' (you can start off with a big number like 300, 400, it depends on the size of your canvas) check the 'preview' box to see if it matches what you want


4. with an Eyedropper tool (I) match the color of 'transformed text' with the background

5. Open the 'Transparency' option by going to Windows > Transparency or by pressing Shift + Ctrl + F10
Change from Normal to Multiply and set Opacity to 40%
6. Copy and paste the 'transformed text' in front of the original 'transformed text'.
And then, set the copied text to normal again by changing Multiply to Normal and the Opacity to 100% (see the picture of step 5)

7. Open 'Appearance' option (by pressing Shift + F6) select the 'copied transformed text' and then, delete the 'transform'

And it's gonna be like this, right?
By the way, I changed the color of the 'normal text' to white.. so I think the tutorial is now completed :D
let's save it as a picture format (PNG, JPG, etc.)
How to Save your project as a Picture Format (PNG, JPG, etc.)
1. Go to File > Export
2. Change "Save as type" to 'JPG' or 'PNG' (or maybe other formats)
3. Click "Export"
4. Change the Settings according to your work
5. And now, your Art Work is done~


That's all for the post today!
if you still confuse how to make it, ask me in the comment below
~Have a great day~
( ͡^ ͜ʖ ͡^)